How to Collect and Plant Southern Magnolia Seed Pods
Have you ever looked at a big, beautiful Southern Magnolia tree and wondered if you could grow one yourself? Well, you totally can! It might seem a bit tricky, but getting Southern Magnolia seed pods and planting them is a cool project. It takes some patience, for sure, but seeing those tiny sprouts turn into a majestic tree is super rewarding. We’ll walk you through everything you need to know, from finding the right seed pods to getting your little trees started.
Key Takeaways
- Southern Magnolia seed pods are best collected in the fall when they start to open and show red seeds.
- You’ll need to clean the red, oily coating off the Southern Magnolia seeds before planting them.
- Southern Magnolia seeds need a cold period, called stratification, to help them sprout, which you can do in your fridge.
- Planting Southern Magnolia seeds in good soil and keeping them moist is important for germination.
- Growing Southern Magnolia trees from seed takes time and patience, as they can take years to bloom.
Growing Southern Magnolia Trees from Seed Pods
So, you’re thinking about growing your southern magnolia tree from seed? That’s awesome! It’s a rewarding process, though it does require some patience. Forget instant gratification; this is a long-term project. But imagine the satisfaction of watching a tiny seed you nurtured grow into a magnificent tree!
Growing a southern magnolia from seed is a great way to propagate these beautiful trees, and it all starts with the seed pods.
Magnolias are beautiful trees, and the idea of growing one from seed is appealing. It’s not as simple as sticking a seed in the ground, but with a little knowledge and effort, you can do it. You’ll need to understand the process of collecting, preparing, and planting the seeds. Plus, you’ll need to know how to care for the seedlings as they grow. It’s a journey, but a worthwhile one.
Think of it like this: you’re not just planting a seed; you’re starting a legacy. A tree that could potentially outlive you, providing beauty and shade for generations to come. That’s pretty cool, right?
Here’s a quick overview of what you’ll need to consider:
- Collecting the seed pods at the right time.
- Extracting and cleaning the southern magnolia seeds.
- Stratifying the seeds to break dormancy.
- Planting the seeds in the right soil mix.
- Providing the right conditions for germination and growth.
When to Collect Southern Magnolia Seed Pods for Best Results
Timing is key when it comes to collecting Southern magnolia seed pods. You want to snag them at the peak of ripeness to ensure the highest chance of successful germination. But how do you know when that is? Let’s break it down.
Generally, the best time to collect magnolia seed pods is in the early fall, typically September or October. This is when the pods have matured and are starting to open, revealing the bright red seeds inside.
Collecting too early might mean the seeds aren’t fully developed, while waiting too long could result in the seeds drying out or being snatched up by hungry critters. It’s a bit of a balancing act, but with a little observation, you’ll get the hang of it.
Here’s a quick guide to help you determine the ideal collection time:
- Observe the color: Look for seed pods that are starting to turn brown but haven’t completely dried out.
- Check for opening: The pods should be beginning to split open, exposing the red seeds.
- Monitor wildlife activity: If you notice birds and squirrels showing a lot of interest, it’s a good sign the seeds are ripe.
Collecting at the right time significantly increases your chances of successfully growing a Southern magnolia from seed. Don’t rush the process; patience is your friend here. If you’re unsure, it’s better to err on the side of collecting slightly later rather than too early. Remember, those flower seeds to harvest are a treasure!
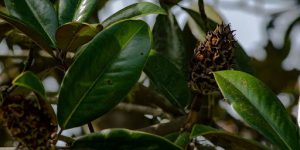
How to Identify Ripe Southern Magnolia Seed Pods
Knowing when to collect your Southern Magnolia seed pods is key to successful germination. You don’t want to jump the gun and grab them too early, or wait so long that the squirrels have a feast! Here’s what to look for:
Visual Cues
- Color Change: Unripe seed pods are typically green. As they ripen, they’ll transition to a brownish or reddish-brown color. This is a primary indicator that they’re getting close.
- Pod Opening: The seed pod, technically a cone of follicles, will begin to open up, revealing the bright red seeds inside. This is a telltale sign that the seeds are ready for harvesting.
- Seed Appearance: The seeds themselves should be a vibrant red color and plump. Avoid pods where the seeds look shriveled or dark.
Timing is Everything
Magnolia trees flower early, sometimes even twice a year. The seed pods develop in late summer and are usually ready for harvest in early autumn, around September or October. Keep a close eye on your trees during this period. It’s a race against the local wildlife.
It’s important to note that not all magnolia trees are created equal. Hybrid varieties might not produce seeds that grow true to the parent tree. If you’re unsure, it’s best to collect from standard species like the Southern Magnolia for the most predictable results.
Feel and Texture
- Slightly Soft Pods: The pods should feel slightly soft and pliable, not rock hard. If they’re still very firm, they’re likely not fully ripe.
- Easy Seed Removal: The seeds should be relatively easy to remove from the pod. If you have to tug and pull excessively, they might not be quite ready. You can buy seeds if you don’t want to wait.
Here’s a quick guide:
| Feature | Unripe | Ripe |
| Pod Color | Green | Brownish-red |
| Pod Texture | Hard | Slightly soft |
| Seed Color | Pale or greenish | Bright red |
| Seed Appearance | Shriveled or small | Plump and full |
| Seed Removal | Difficult | Easy |
Tools and Supplies Needed to Collect Magnolia Seed Pods
Okay, so you’re ready to gather some Southern Magnolia seed pods! Before you head out, it’s a good idea to get your gear together. Trust me, having the right tools makes the whole process way easier and more efficient. You don’t want to be halfway up a tree, realizing you forgot something important. Here’s a rundown of what you’ll probably need:
- Gloves: Trust me on this one. Those seed pods can be sticky and a bit messy. A good pair of gardening gloves will keep your hands clean and protected.
- Clippers or Pruning Shears: You’ll need something to cut the seed pods from the branches. Make sure they’re sharp for clean cuts. Dull clippers can damage the tree.
- Collection Basket or Bag: You’ll need something to put the seed pods in as you collect them. A sturdy basket or a canvas bag works great. Plastic bags can trap moisture and cause the pods to mold.
- Ladder (if needed): If the seed pods are high up, you’ll need a ladder to reach them safely. Always use caution when working at heights. Have someone spot you if possible.
- Eye Protection: It’s always a good idea to protect your eyes from falling debris. Safety glasses or goggles will do the trick.
- Magnolia Seed Collection Cage: If you want to make the job easier, consider using a collection cage. This tool is designed to efficiently gather objects like magnolia seeds.
Collecting magnolia seed pods is a rewarding experience, but it’s important to be prepared. Having the right tools not only makes the job easier but also ensures the safety of both you and the tree. Take a few minutes to gather your supplies before you start, and you’ll be well on your way to growing your own Southern Magnolia trees.
Once you’ve gathered your seed pods, you’ll need to clean and prepare the seeds for planting. This involves removing the red coating and stratifying the seeds to break their dormancy. But that’s a story for another section!
Step-by-Step Guide to Harvesting Southern Magnolia Seeds
Okay, so you’re ready to get your hands dirty and harvest some Southern Magnolia seeds? Awesome! It’s not rocket science, but there are a few things you need to know to do it right. Let’s break it down into easy steps.
Finding the Right Seed Pods
First things first, you can’t just grab any old seed pod. You need to find the ones that are ready to give up their seeds. Look for the cones that are starting to open up and show those bright red seeds inside. If the cones are still tightly closed, they’re not quite ready yet. You can pick them, but you’ll need to let them dry out a bit more before you can get the seeds out.
Gathering Your Magnolia Seed Pods
Once you’ve spotted some promising cones, gently pluck them from the tree. I usually wear gloves for this, just because sometimes the cones can be a little sticky or have some sap on them. Plus, you never know what kind of critters might be hanging out in there! Put the cones in a basket or bag as you go. Don’t worry if some of the seeds fall out while you’re collecting; that just means they’re extra ripe!
Extracting the Seeds
Now comes the fun part: getting the seeds out. If the cones are already open, you can usually just shake them, and the seeds will fall right out. If they’re a bit more stubborn, you can gently pry them open with your fingers. Be careful not to damage the seeds in the process. Those red magnolia seeds are precious cargo.
Cleaning the Seeds
Those bright red seeds have a coating on them, and you’ll need to get that off before you can plant them. It’s kind of oily and can inhibit germination. The easiest way to do this is to soak the seeds in warm, soapy water for a day or two. Then, give them a good scrub with a rough cloth or even some steel wool. You’re aiming to get all that red stuff off, leaving you with a clean, tan-colored seed. Rinse them well after scrubbing.
Harvesting Southern Magnolia seeds is a rewarding process. It connects you with nature and allows you to propagate these beautiful trees. Remember to be patient and gentle throughout the process, and you’ll be well on your way to growing your own Southern Magnolias.
Drying the Seeds
After you’ve cleaned the seeds, spread them out on a paper towel to dry. Make sure they’re in a well-ventilated area so they don’t get moldy. Let them dry for a few days, until they’re completely dry to the touch. Now you’re ready to move on to the next step: stratification.
How to Clean and Prepare Magnolia Seeds for Planting
Okay, so you’ve got your Southern Magnolia seed pods, and you’re ready to get those seeds prepped for planting. This part is pretty important because magnolia seeds have a coating that can prevent them from sprouting if you don’t take the time to remove it. Let’s get into the nitty-gritty.
Removing the Outer Coating
Magnolia seeds are covered in a reddish, oily outer layer called the sarcotesta. This layer needs to go because it contains germination inhibitors. The easiest way I’ve found to remove it is by soaking the seeds in warm water for a day or two. This softens the coating, making it easier to scrub off. After soaking, you can use a rough cloth, a wire mesh screen, or even just your fingers to rub the coating off. It can be a little messy, but it’s worth it.
Washing the Seeds
Even after removing the bulk of the outer coating, there’s still likely to be some oily residue left on the seeds. This residue can also hinder germination, so you’ll want to wash the seeds thoroughly. I usually use a mild dish soap and warm water. Gently scrub the seeds to remove any remaining oiliness, then rinse them well under running water until they feel clean. This step is crucial for successful germination.
Scarifying the Seeds (Optional)
Scarification involves slightly damaging the seed coat to allow water to penetrate more easily. While not always necessary, it can improve germination rates, especially if your seeds have a particularly tough outer layer. You can gently rub the seeds with sandpaper or a file to thin the seed coat. Be careful not to damage the inside of the seed! This process helps to break down the seed’s defenses, making it easier for the seedling to emerge. Think of it as giving the seed a little head start.
Preparing magnolia seeds is a bit of a process, but it significantly increases your chances of success. Taking the time to properly clean and prepare the seeds ensures that they have the best possible start, leading to healthier and more vigorous seedlings. It’s an investment of time that pays off in the long run.
Drying the Seeds
After washing and scarifying (if you choose to do it), you’ll want to dry the seeds before storing or stratifying them. Spread the seeds out on a paper towel in a cool, dry place, away from direct sunlight. Let them dry for a few days, turning them occasionally to ensure they dry evenly. You don’t want them to be bone-dry, just dry to the touch. This prevents mold growth during storage or stratification. Here’s a quick summary:
- Soak seeds in warm water for 24-48 hours.
- Remove the outer coating by scrubbing.
- Wash seeds with mild dish soap and rinse thoroughly.
- Scarify seeds gently (optional).
- Dry seeds on a paper towel in a cool, dry place.
With these steps, your magnolia seeds will be ready for stratification or planting, depending on the time of year. Good luck!
The Importance of Stratification in Southern Magnolia Seeds
So, you’ve got your Southern Magnolia seeds all cleaned and ready to go. But hold on a second! There’s a crucial step you absolutely can’t skip if you want to see those seeds sprout: stratification. What is it? It’s tricking the seed into thinking it’s been through winter. Magnolia seeds have a natural dormancy, and they won’t germinate until they’ve experienced a period of cold and moisture. Think of it as nature’s way of making sure they don’t sprout at the wrong time of year.
Stratification is essential for breaking seed dormancy and achieving successful germination. Without it, your seeds might just sit there, doing absolutely nothing. It’s like trying to start a car with a dead battery – it just won’t happen.
Why is this cold period so important? Well, the seeds contain substances that prevent germination too early. By exposing the seeds to cold and moist conditions, these inhibitors are broken down, allowing the seed to wake up and get ready to grow. It mimics the natural process where seeds fall to the ground in autumn and only germinate in the spring after experiencing winter’s chill.
Here’s why you should care about stratification:
- It significantly increases germination rates. You’ll get way more seedlings if you stratify.
- It promotes stronger, healthier seedlings. The cold treatment helps the seedlings get a better start.
- It ensures the seeds germinate at the right time of year, avoiding frost damage.
Skipping stratification is a common mistake that many beginner gardeners make. They plant the seeds, get frustrated when nothing happens, and then assume the seeds were bad. But in reality, the seeds just needed that cold period to kickstart the germination process. Don’t let this happen to you.
Think of it this way: you wouldn’t try to bake a cake without preheating the oven, right? Stratification is like preheating the oven for your magnolia seeds. It sets the stage for successful growth. You can stratify magnolia seeds in the fridge for a few months. So, don’t skip this step – your future magnolia tree will thank you for it.
How to Stratify Southern Magnolia Seeds at Home
Stratification is tricking the seeds into thinking they’ve gone through winter. Southern magnolia seeds need this cold period to break their dormancy and get ready to sprout. If you skip this step, you might end up with very poor germination rates, or none at all. It’s not hard to do at home, and it makes a huge difference. Stratification mimics the natural winter conditions that magnolia seeds would experience in the wild.
Refrigerator Method
This is probably the easiest and most common way to stratify magnolia seeds. You’re essentially creating a mini-winter for them in your fridge. Here’s how:
- Mix your cleaned magnolia seeds with a moist medium. Peat moss or seed-starting mix works great. Make sure it’s damp, not soaking wet. You don’t want the seeds to rot.
- Place the mixture in a plastic bag or container. A zip-top bag works well. Label it with the date and type of seed. This is important, especially if you’re stratifying multiple types of seeds.
- Store in the refrigerator for 2-3 months. The ideal temperature is around 35-45°F (2-7°C). Check the bag periodically to make sure the medium is still moist. If it’s drying out, add a little water.
Outdoor Method
If you live in an area with mild winters, you can try stratifying your magnolia seeds outdoors. This method relies on natural temperature fluctuations, so it’s a bit less predictable than using the refrigerator. You can prepare magnolia seeds for planting in the fall.
- Plant the seeds in a pot or directly in the ground. Choose a spot that’s protected from strong winds and direct sunlight.
- Cover the seeds with a layer of mulch. This will help to retain moisture and protect them from extreme temperature changes.
- Monitor the seeds throughout the winter. Make sure the soil doesn’t dry out completely. You might need to water them occasionally, depending on the weather.
Cold Frame Method
A cold frame is basically a mini-greenhouse that you can use to protect plants from the cold. It’s a good option if you want to give your magnolia seeds a head start in the spring. This method offers a bit more control than simply planting outdoors, but it still relies on natural temperature fluctuations.
- Plant the seeds in a seed tray or small pots filled with well-draining potting mix.
- Place the tray or pots inside the cold frame.
- Keep the soil moist throughout the winter. Open the cold frame on warm days to prevent the seeds from overheating.
No matter which method you choose, it’s important to be patient. Stratification takes time, and you won’t see results overnight. But with a little effort, you can successfully stratify your magnolia seeds and increase your chances of growing healthy, beautiful trees.
Here’s a quick comparison of the different stratification methods:
| Method | Pros | Cons |
| Refrigerator | Easy to control temperature and moisture. | Requires space in the refrigerator. |
| Outdoor | Natural and requires no extra equipment. | Less control over temperature and moisture. Susceptible to pests. |
| Cold Frame | Provides some protection from the elements. | Requires a cold frame. Temperature can fluctuate. |
Best Soil Mix for Germinating Magnolia Seed Pods
Choosing the right soil mix is super important for getting your magnolia seeds to sprout. It’s not just about throwing some dirt in a pot; you need a mix that drains well, holds moisture, and provides the right nutrients. Think of it as creating the perfect little home for your future magnolia tree.
A well-draining, slightly acidic mix is ideal for magnolia seed germination.
Here’s what I’ve found works best:
- Peat Moss: This helps retain moisture without waterlogging the soil. It also adds some acidity, which magnolias like.
- Perlite: This improves drainage and aeration, preventing the soil from becoming compacted. Compacted soil can suffocate the seeds.
- Sand: Adding a bit of coarse sand further enhances drainage. Make sure it’s not beach sand, which contains salt.
I usually go for a mix that’s about one-third peat moss, one-third perlite, and one-third sand. You can also add a little bit of compost to give the seeds a nutrient boost, but don’t overdo it. Too much compost can make the soil too rich and hinder germination. Remember to use seed stratification techniques to improve germination rates.
I’ve also had success with commercial seed-starting mixes, but I always add extra perlite to improve drainage. You can find these mixes at most garden centers. Just make sure they don’t contain any added fertilizers, at least not in high concentrations, as these can burn the delicate seedlings. Before planting, remember to clean and prepare magnolia seeds properly.
How to Plant Southern Magnolia Seeds in Pots or Outdoors
Okay, so you’ve got your magnolia seeds all prepped and ready to go. Now comes the fun part: planting them! You’ve got a couple of options here – pots or directly in the ground. Both can work, but there are a few things to keep in mind to give your little magnolia seedlings the best start.
Planting in Pots
If you’re starting your seeds in pots, which is what I usually do, make sure you pick a pot that’s big enough to give the roots some room to grow. I’d say at least a gallon-sized pot is a good starting point. Good drainage is key, so make sure your pot has drainage holes. You don’t want your seeds sitting in soggy soil, or they’ll rot before they even get a chance to sprout. Use a high-quality potting soil mix.
Here’s a quick rundown of the steps:
- Fill the pot with your soil mix, leaving about an inch of space at the top.
- Make a small hole in the center of the pot, about 1/2 inch deep.
- Place your magnolia seed in the hole and cover it gently with soil.
- Water the pot thoroughly, until water drains out of the bottom.
Planting Outdoors
Planting directly in the ground can work too, especially if you live in an area with mild winters. Just make sure you choose a spot that gets partial shade, especially during the hottest part of the day. Magnolia seedlings don’t like getting scorched by the sun. Also, make sure the soil is well-draining. You might want to amend the soil with some compost or other organic matter to improve drainage and fertility.
Here’s how to plant outdoors:
- Choose your planting spot carefully, considering sunlight and soil drainage.
- Dig a hole that’s about twice as wide as the seed and just as deep.
- Place the seed in the hole and cover it gently with soil.
- Water the area thoroughly.
No matter where you plant, keep the soil consistently moist, but not waterlogged. Check the soil moisture regularly, and water when the top inch feels dry to the touch. Be patient – magnolia seeds can take a while to germinate, so don’t get discouraged if you don’t see any sprouts right away.
Ideal Temperature, Light, and Watering Conditions for Seedlings
So, you’ve managed to get your Southern Magnolia seeds prepped and planted. Awesome! Now comes the part where you have to baby them a little to make sure they get the best start in life. Getting the temperature, light, and watering just right is super important for those tiny seedlings. Think of it like setting up the perfect nursery for your future tree.
Temperature
Magnolia seeds, once sprouted, prefer consistent warmth. Aim for daytime temperatures between 65-75°F (18-24°C). Nighttime temperatures shouldn’t dip too far below 60°F (15°C). A sudden cold snap can set them back, so if you’re growing them in pots, be ready to bring them inside if the weather turns nasty. If you’re starting them indoors, a heat mat can be a great way to maintain consistent soil temperature, especially during the germination phase.
Light
Light is food for plants, and magnolia seedlings are no exception. They need bright, indirect light. A south-facing window is often ideal, but be careful of direct sunlight, which can scorch those delicate leaves. If you don’t have a naturally bright spot, consider using a grow lamp. These can provide the necessary light spectrum for healthy growth, especially during the shorter days of winter. Watch your seedlings closely; if they start to look leggy (tall and spindly), it’s a sign they aren’t getting enough light.
Watering
Watering is a balancing act. You want to keep the soil consistently moist, but not waterlogged. Overwatering can lead to root rot, which is a death sentence for seedlings. Check the soil moisture regularly by sticking your finger about an inch into the soil. If it feels dry, it’s time to water. When you do water, do it thoroughly, allowing the excess water to drain out of the bottom of the pot. Here’s a quick guide:
- Frequency: Check soil moisture daily.
- Amount: Water thoroughly until excess drains.
- Method: Avoid overhead watering to prevent fungal diseases.
It’s better to underwater slightly than to overwater. Seedlings can recover from being a little dry, but root rot is often irreversible. Pay close attention to the weather and adjust your watering schedule accordingly. Hot, sunny days will dry out the soil faster than cool, cloudy ones.
Humidity
While not as critical as temperature, light, and water, humidity plays a role. Magnolia seedlings like a bit of humidity. If you live in a dry climate, you can increase the humidity around your seedlings by:
- Grouping plants.
- Using a humidifier.
- Place the pots on a tray filled with pebbles and water (making sure the bottom of the pot isn’t sitting directly in the water).
By paying attention to these factors, you’ll give your Southern Magnolia seedlings the best possible start, setting them up for a long and healthy life. Remember, patience is key! Growing trees from seed takes time, but the reward of watching your magnolia grow from a tiny seed is well worth the effort. Don’t forget to use a well-drained potting medium for best results.
How Long Does It Take for Southern Magnolia Seeds to Sprout?
Patience is key when growing Southern Magnolias from seed. It’s not a quick process, but the reward of a beautiful, blooming tree is well worth the wait. So, how long exactly will you be waiting for those first signs of life?
Generally, you can expect to see sprouts emerge anywhere from two months after planting your stratified seeds. However, this timeframe can vary depending on several factors, including the freshness of the seeds, the effectiveness of your stratification process, and the environmental conditions.
Don’t be discouraged if you don’t see anything happening right away. Some seeds may take longer than others to germinate. Just make sure you’re providing the right conditions, and be patient.
Remember that growing magnolias from seed is a long-term commitment. Even after the seeds sprout, it can take several years for the seedlings to mature and produce their first flowers. Some can take as long as 15 years to bloom!
Here’s a general timeline to keep in mind:
- Seed Collection: Fall
- Stratification: 3-6 months (ideally in the refrigerator)
- Germination: 2+ months after planting
- First Year Growth: Seedlings may reach 4-11 inches in height.
To improve your chances of success, make sure you’re using fresh seeds, properly stratifying them, and providing them with the right soil, moisture, and light. Planting magnolia seeds in autumn can be a good strategy, but make sure you’re prepared for winter.
Transplanting Magnolia Seedlings and Long-Term Care Tips
Timing Your Transplant
Late winter or early spring, just as new leaves begin to swell, is the best window to move young magnolias. You want soil that’s workable but still cool, giving roots time to settle before heat hits. As you prep your yard, check local frost dates and aim for a week or two before the last expected freeze. Plus, as Kaleb from Wyse Guide shows in transplanting magnolia trees, early spring moves are a breeze.
Setting Up the New Site
Pick a spot with well-draining soil and room for roots to spread—magnolias don’t like cramped quarters. Aim for:
- At least 15 feet from buildings or other large trees
- Soil pH between 5.0 and 6.5 (slightly acidic)
- Morning sun with afternoon shade or dappled light
Dig a hole twice as wide as the root ball but no deeper than its current depth. Loosen the soil around the edges to help roots push out.
Moving the Seedlings
Gently lift the seedling by its root ball, not the stem. Keep the soil around the roots intact to prevent shock. Place it in the new hole so the top of the root ball sits level with the surrounding ground. Fill in with soil, pressing lightly to remove air pockets.
Initial Post-Transplant Care
Water right after planting and keep the soil evenly moist for the first month. Mulch around the base—2 inches deep but pulled back a few inches from the stem—to lock in moisture and block weeds.
| Week | Watering Frequency | Amount per Session |
| 1–2 | Daily | 1 inch |
| 3–4 | Every other day | 1 inch |
| 5+ | Twice a week | 1–2 inches |
Young magnolia roots need consistent moisture. Don’t let the soil dry out completely or stay soggy.
Ongoing Care and Pruning
After the first month, you can ease off watering, but always check soil moisture before adding water. In the first year:
- Feed with a balanced, slow-release fertilizer in early spring
- Prune only dead or crossing branches in late winter
- Watch for pests like scale insects and treat early
Keep an eye on growth. A healthy seedling can add 10–20 inches in its first year. Beyond that, annual checks on mulch, soil, and branch health will keep your magnolia happy for decades.
Want to learn more about giving your magnolia seedlings the best start in life? Head over to our website for a complete guide on planting and caring for these beautiful trees. You’ll find tons of helpful tips to make sure your magnolias grow strong and healthy.
Frequently Asked Questions
Why do magnolia seeds have a red coating?
Magnolia seeds are covered in a red, oily layer that stops them from drying out. This layer, called sarcotesta, also helps protect the seeds. If you buy seeds, make sure they still have this natural coating or are kept moist.
How do I remove the red coating from magnolia seeds?
You can usually remove the red coating with your fingernails. After you peel them, it’s important to wash the seeds with dish soap. This oil can stop the seeds from sprouting, so getting rid of it with liquid soap helps with germination.
What is seed stratification, and why is it important for magnolia seeds?
Seed stratification means giving the seeds a cold period, like winter. This is because magnolia seeds naturally have things in them that stop them from sprouting too early. In nature, seeds fall in the fall and then sprout in the spring after the cold winter. By stratifying them, you’re tricking the seeds into thinking winter has passed, so they’re ready to grow.
Can I plant magnolia seeds directly outside?
Yes, you can plant magnolia seeds outdoors. If you choose this method, plant them about half an inch deep and cover them with a layer of mulch. The mulch helps keep the soil moist. Just be aware that if it gets too cold or too dry, or if squirrels find them, they might not make it.
When is the best time to collect magnolia seed pods?
Magnolia trees usually start making their cone-shaped seed pods in early autumn. These pods will split open to show bright red berries. When you see these red berries, it’s the right time to gather the seeds.
Which magnolia species are best for collecting seeds?
It’s best to collect seeds from standard magnolia types, like the Southern magnolia, rather than from hybrid or special varieties. Hybrid seeds might not grow into a tree that looks like the parent plant because they are a mix of two different types.
Where can I find magnolia tree seeds?
You can get magnolia seeds from mature magnolia trees in your area by collecting them directly from the cones in the fall. If you don’t have access to local trees, you might be able to find them for sale online or at specialized nurseries, though they can sometimes be hard to find commercially.
How long does it take for magnolia seeds to sprout and bloom?
After planting, it can take a few weeks or even longer for magnolia seeds to sprout. Be patient, as growing magnolias from seed takes time. And remember, it can take as long as 10 to 15 years before a new magnolia tree grown from seed produces its first flowers!
Request a Quote
Our Services


