How to Grow and Care for a Black Cherry Seedling
I’ve always been drawn to the idea of growing my own trees, and the black cherry seedling seems like a great place to start. It’s a native tree with a lot of history, and I’m excited to learn how to get one going from seed. This guide is all about breaking down the process, from collecting those little seeds to making sure your young black cherry seedling thrives. I’ll share what I’ve learned about giving them the right conditions, keeping them healthy, and what to expect as they grow.
Key Takeaways
- Black cherry seeds require a period of cold, moist stratification to germinate, mimicking winter conditions.
- Winter sowing is a viable alternative to refrigerator stratification, offering a simpler method with less risk of mold.
- Proper site selection with well-drained soil and adequate sunlight is important for young black cherry seedlings.
- Consistent watering is needed for establishment, but mature trees are somewhat drought-tolerant; avoid waterlogged soil.
- Protecting young seedlings from pests, diseases, and wildlife like deer and rabbits is crucial for their early survival and growth.
Introduction to Black Cherry Seedlings (Prunus serotina)
So, you’re thinking about growing a black cherry seedling? That’s a great idea! I’ve been growing these trees for a while now, and honestly, they’re special. For starters, the wood from a mature black cherry tree is sought after for furniture because of its beautiful color and grain. But even before it gets that big, the tree itself is a fantastic addition to any yard or landscape. It’s a native North American tree, which means it’s well-suited to our climate and supports local wildlife.
Here are a few reasons why I think growing a black cherry seedling is a worthwhile project
- Wildlife Attraction: The cherries themselves are a food source for tons of birds, like robins and blue jays, as well as mammals such as squirrels and deer. It’s like building your own little wildlife buffet.
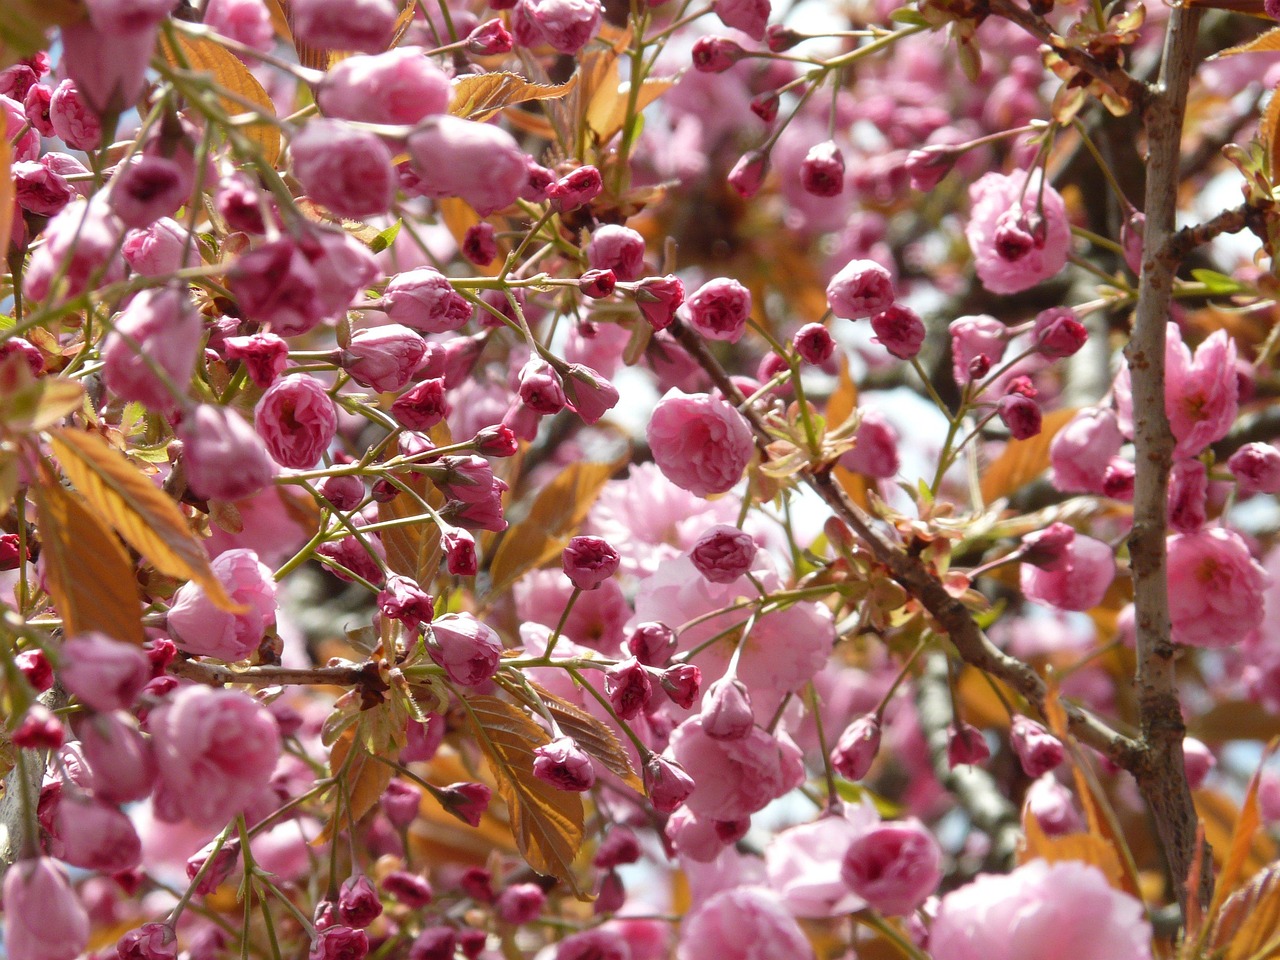
- Beautiful Blooms: In the spring, the tree produces lovely white flowers that are quite fragrant.
- Fall Color: As the seasons change, the leaves turn a nice yellow to red, adding some color to your landscape.
- Valuable Timber: Down the road, if you let it grow, the wood is highly prized for its rich color and tight grain, making it a valuable asset. You can find more information about the wood’s qualities on pages discussing Prunus serotina timber.
It’s not just about the fruit or the wood, though. There’s a real satisfaction in nurturing a tree from a tiny seed. It connects you to nature in a direct way. Plus, they’re not overly fussy once they get going, which is always a plus in my book.
Starting with a seedling means you get to witness the entire growth process. It’s a slow journey, but watching it develop from a tiny sprout into a sturdy young tree is incredibly rewarding. It’s a long-term investment in your landscape and a connection to the natural world.
Seed Collection & Preparation
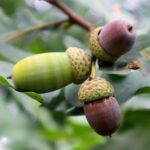
Collecting seeds from black cherry trees, or Prunus serotina, is a straightforward process, but there are a few things I always keep in mind to get the best results. The fruit usually ripens in mid to late summer, and you’ll know they’re ready when they turn a deep, dark purple-black color. That’s when the sugars are at their peak, and the seeds inside are mature. I usually grab a small bag and head out to the trees, trying to get to them before the birds do – they love these cherries as much as I do! It’s a bit of a race against time, honestly.
Once I have the cherries, the next step is getting the seeds out. It’s not complicated, but it can be a little messy. I just take a cherry, pinch it gently between my fingers, and squeeze out the seed, which looks more like a small nut. Then, I rinse these seeds under cool tap water to get rid of any leftover fruit pulp. After rinsing, I spread them out on a paper towel to pat them dry. It’s important to get them reasonably dry before storing them, especially if I’m not planning to stratify them right away.
Here’s a quick rundown of what I do
- Harvesting: Pick cherries when they are dark purple-black.
- Extraction: Gently squeeze the fruit to remove the seed.
- Cleaning: Rinse seeds thoroughly under running water.
- Drying: Pat seeds dry with a paper towel.
If I plan to stratify the seeds in the refrigerator, I’ll sometimes give them a quick wash in a very dilute bleach solution (about 10% bleach to water) before rinsing and drying. This helps prevent any mold from growing on the seeds during the cold stratification period. It sounds a bit much, but it can help with germination rates later on.
Cold Stratification
When I first started trying to grow black cherry trees from seed, I kept hearing about something called “cold stratification.” It sounds a bit fancy, but it’s just a way to trick the seeds into thinking winter has passed so they’re ready to sprout. Black cherry seeds, like many tree seeds from temperate climates, have a built-in delay. They need a period of cold, moist conditions to break dormancy. Without this, they might just sit there, refusing to grow, even if you give them perfect warmth and water.
So, how do I actually do this? My go-to method involves a few simple steps. First, I make sure my seeds are clean. Then, I get them ready for their chilly spa treatment. There are a couple of ways to go about this, and I’ve tried both.
The Paper Towel Method: This is straightforward. I take a couple of paper towels, get them nice and damp – not dripping, just moist. Then, I lay out the seeds on one part of the towel, fold it over a couple of times to sandwich the seeds between layers of damp paper, and pop the whole thing into a zip-top bag. I label it with the date and toss it in the back of the fridge. It needs to stay there for at least four months. It’s important to check on it periodically to make sure the paper towels haven’t dried out.
The Moist Sand Method: Another way is to use something like play sand or vermiculite. I get the sand thoroughly wet, then wring out the excess water. I put a layer of this damp sand in a plastic container, place the seeds on top, and then cover them with more damp sand. Seal the container and put it in the refrigerator for the same four-month period. Again, keeping an eye on moisture is key.
I’ve experimented a bit with different timings and conditions, and honestly, just focusing on that cold, moist period seems to be the most important part for black cherry seeds. I’ve found that giving them about five months of this treatment boosts their chances of sprouting when the time is right.
Mimicking the natural cycle of winter is the core idea here. By providing that extended period of cold and moisture, you’re essentially telling the seed, “Okay, winter’s over, it’s safe to grow now.” It’s a patient process, but it makes a big difference in getting those little trees started.
It’s worth noting that some sources mention a warm stratification period followed by cold stratification. While this can work, I’ve found that simply focusing on the cold stratification is effective and less complicated. The goal is to get those seeds exposed to winter-like conditions, and the fridge does a good job of that.
Alternative
While cold stratification in the fridge works, I’ve found that winter sowing is a much simpler and less fussy way to get black cherry seeds going. It basically mimics the natural process, letting the seeds experience the cold and moisture they need right in a container outdoors. This method also cuts down on the risk of mold or other nasty things that can sometimes get to seeds kept in the fridge.
To give winter sowing a try, you’ll need a container that’s at least 6 inches deep. Fill it with some potting soil that’s already been moistened, but leave about an inch of space at the top. Gently firm the soil down – not too hard, just enough so it’s settled. Then, place two or three black cherry seeds on the surface.
Cover the seeds with about a quarter to three-eighths of an inch of moist potting soil. It’s important to keep these containers in a spot that’s cold but protected from critters like squirrels and rodents. Crucially, you must prevent the seeds from freezing solid, but also make sure the soil doesn’t dry out. I usually check mine weekly and add a little water if needed, just to keep things consistently moist.
As spring starts to show up, you can move the containers to a spot that gets morning sun and afternoon shade. You should start seeing germination in early spring, often around April, even if there are still some chilly nights.
Here’s a quick rundown of the key points for success
- Container Depth: Use a container at least 6 inches deep.
- Soil Moisture: Keep the soil consistently moist, but not waterlogged.
- Temperature: Protect from freezing solid, but ensure a cold environment.
- Protection: Shield from pests like squirrels and rodents.
The goal with winter sowing is to provide a stable, cold, and moist environment that the seeds need to break dormancy naturally. By placing them outdoors in a protected spot, you’re essentially letting nature do most of the work.
Germinating Cherry Seeds
After all that waiting and stratification, the moment of truth arrives: germination. It’s pretty exciting to see those first little sprouts pushing through the soil. I’ve found that once the seeds have had their cold, moist period, they’re usually ready to go. I typically plant my stratified seeds about a quarter to three-eighths of an inch deep in a good-quality potting mix. Don’t overthink the soil; most standard mixes work just fine.
I usually plant a few seeds per pot, just in case not all of them decide to sprout.
- Prepare your pots: Make sure they have drainage holes.
- Sow the seeds: Place them at the recommended depth, about 1/4 to 3/8 inch down.
- Water gently: Moisten the soil thoroughly, but avoid washing the seeds away.
- Provide warmth: Keep the pots in a warm spot, around 70-75°F (21-24°C), to encourage germination.
The key is consistent moisture and warmth. I’ve noticed that if the soil dries out, it can set back the process, and sometimes, seeds won’t recover.
It’s also worth noting that some seeds might germinate while still in the stratification process, especially if they experience a warm spell. I’ve had a few sprouts in the fridge, which is fine. I just carefully move them to a pot with soil and continue the process.
When you start seeing those tiny green leaves unfurl, it’s a good sign. The first leaves you see are called cotyledons, and they’re not true leaves yet. The real leaves will appear shortly after, and they’ll look more like the leaves of a young cherry tree. It’s a slow process at first, but patience is rewarded.
Transplanting Seedlings
Once your black cherry seedlings have developed a few sets of true leaves and are showing good vigor, it’s time to think about moving them to their own pots. This process, often called “potting up” or transplanting, gives their roots more space to grow and prevents them from becoming root-bound, which can stunt their development. I usually wait until I see the roots starting to peek out of the drainage holes at the bottom of their current container, or when the seedling seems to be drying out very quickly after watering. This typically happens in mid-spring for seeds started indoors.
When you’re ready to transplant, gather your supplies: new pots (at least 4-6 inches deep), fresh potting mix, and a trowel or spoon for gently loosening the soil. It’s a good idea to have the new pots prepared with a bit of moist soil before you start.
Here’s how I go about it
- Prepare the new pots: Fill them about two-thirds full with your potting mix. Make sure the mix is slightly damp, not soaking wet.
- Gently remove the seedling: Tip the current container on its side and carefully slide the seedling out. If it’s stuck, a gentle tap or running a knife around the edge might help. Try not to pull on the stem.
- Separate if necessary: If you planted multiple seeds in one pot and they all sprouted, you’ll need to gently tease the roots apart. This can be a bit tricky, as the roots are still quite tender. I find it helps to gently massage the root ball before trying to separate them. If a few roots break, don’t panic; it’s usually not a death sentence.
- Place in the new pot: Position the seedling in the center of the new pot. The goal is to plant it at the same depth it was growing before. You don’t want to bury the stem any deeper than it already is.
- Fill with soil: Add more potting mix around the roots, gently firming it with your fingers as you go. This helps eliminate air pockets and ensures good root-to-soil contact.
- Water thoroughly: Give the newly potted seedling a good watering. This helps settle the soil and reduces transplant shock.
After transplanting, I like to keep the seedlings in a slightly shaded spot for about a week, allowing them to adjust. Gradually, I’ll move them into brighter light. It’s important to monitor their moisture levels closely during this period, as their root systems are still establishing.
Transplanting is a delicate stage, and while it might seem daunting, taking your time and being gentle will greatly increase your seedling’s chances of thriving. Remember, the goal is to disturb the roots as little as possible while giving them the space they need to grow strong.
If you’re transplanting seedlings that have been growing outdoors, the timing is a bit different. I’ve found that transplanting can continue as long as the ground isn’t frozen, even into December. However, if the weather starts getting consistently warm, say daytime highs in the 70s or 80s Fahrenheit, it’s often better to wait until late summer or early fall to transplant them into their final spot. This avoids stressing the young trees during hot weather. For those looking to establish their trees in the ground, understanding proper planting conditions is key, and I’ve found resources on site selection helpful.
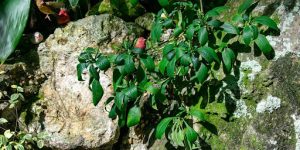
Site Selection & Planting Conditions for Young Black Cherry Seedlings

Choosing the right spot for your young black cherry seedling is important for its future health. I’ve found that these trees do best when they get plenty of sunlight. Full sun is ideal, meaning at least six hours of direct sunlight each day. While they can handle a bit of shade, especially in hot climates where some afternoon shade might prevent stress, they grow much better with full sun exposure. Think about where the sun travels across your yard throughout the day. You want a spot that gets that good morning sun and continues to get light for most of the afternoon.
Soil is another big factor. Black cherries aren’t too picky, but they do have preferences. They like soil that drains well, meaning water doesn’t just sit around the roots. Soggy soil can cause all sorts of problems. They also tend to do better in soil that’s a bit on the acidic side, though neutral soil is usually fine too. If your soil is heavy clay, you might want to mix in some compost or other organic matter to help with drainage and give your seedling a good start. I usually aim for a soil pH between 6.0 and 7.0.
When it comes to planting, I usually wait until mid-spring, after the last frost. The soil is warming up, and the seedling has a good chance to establish itself before the summer heat kicks in. If you miss that window and it starts getting consistently warm, like into the 70s or 80s Fahrenheit, it’s often better to wait until late summer or early fall. The cooler temperatures then will be less stressful for the young tree, and the soil will stay moist more easily.
Here’s a quick rundown of what to look for
- Sunlight: Aim for full sun (6+ hours daily).
- Soil: Well-draining, slightly acidic to neutral pH.
- Space: Give it room to grow; check mature size.
- Protection: Consider protection from deer and rabbits, especially when young.
When I’m deciding on a spot, I also think about how much space the tree will need as it gets bigger. Black cherries can grow into substantial trees, so I try to pick a location where they won’t be crowded by other trees or structures down the line. It’s easier to give it space now than to deal with problems later.
Watering Guidelines
Keeping your young black cherry seedling hydrated is important, especially as it gets settled into its new spot. I’ve found that the key is consistency, not just dumping a ton of water all at once. Think of it like this: you want the soil to be moist, like a wrung-out sponge, but not waterlogged. Too much water can actually be worse than not enough, leading to root rot.
When I first transplant a seedling, I give it a good, thorough watering. After that, I check the soil moisture every couple of days. If the top inch or so feels dry, it’s time for another drink. This usually means watering every 3-5 days, depending on how hot it is and how quickly the soil drains.
Here’s a general idea of how much water to aim for
- Newly transplanted seedlings: Water deeply after planting. Aim for about 1-2 cups of water per seedling, making sure it soaks into the root zone.
- Established seedlings (first year): Water every 3-7 days. Provide enough water to moisten the soil to a depth of 6-8 inches. This might be around 1-2 quarts per watering.
- During dry spells: You might need to water more frequently, perhaps every 2-3 days, especially if you notice the leaves starting to droop.
It’s always better to water less often but more deeply. This encourages the roots to grow down into the soil, making the tree more resilient. Shallow, frequent watering keeps the roots near the surface, where they can dry out quickly.
I try to water in the morning if I can. This gives the leaves time to dry off before nightfall, which helps prevent fungal issues. If you’re using a watering can, try to water the base of the plant, avoiding the foliage as much as possible. For larger seedlings, a gentle hose setting works well. Remember, the goal is to help the roots establish, and consistent moisture is how you get there.
Fertilization Tips
When it comes to feeding your young black cherry seedling, I’ve found that less is often more, especially in the first year. These trees are self-sufficient when they’re just starting out. Over-fertilizing can actually do more harm than good, leading to weak, leggy growth that’s more susceptible to problems. My approach is to focus on building a healthy soil environment rather than relying heavily on synthetic fertilizers.
For the first year, I usually don’t add any extra fertilizer at all. The nutrients present in a good-quality potting soil where you’ve planted it are generally enough. If I do decide to give it a little boost, I’ll opt for a balanced, slow-release organic fertilizer, maybe something with a 10-10-10 or similar ratio, applied very sparingly in late spring or early summer. I’m talking about a tiny amount, maybe a quarter of what the package recommends.
Here’s a general guideline I follow
- First Year: No supplemental fertilizer needed if using good potting soil. If planting directly into the ground, a light application of compost mixed into the soil before planting is usually sufficient.
- Second Year: If growth seems slow, I might apply a light feeding of a balanced organic fertilizer (like a 5-5-5 or 10-10-10) in early spring, before new growth kicks in. Again, use it sparingly.
- Third Year and Beyond: As the tree gets more established, I’ll continue with a light feeding of organic fertilizer in early spring, or simply rely on top-dressing with compost annually. I pay attention to the tree’s vigor; if it looks healthy and is growing at a reasonable pace, I won’t force it with more food.
It’s important to remember that black cherry trees, in particular, are not heavy feeders. They’ve evolved to thrive in a variety of conditions, often with minimal nutrient input. My goal is to support their natural growth pattern, not to accelerate it unnaturally, which can lead to weaker wood and increased susceptibility to pests and diseases.
I also find that incorporating compost into the soil annually is a fantastic way to provide a slow, steady release of nutrients and improve soil structure. It’s a gentler approach that benefits the long-term health of the seedling.
Pruning Young Seedlings
When you’re working with young black cherry seedlings, a little bit of pruning can go a long way in helping them grow strong and healthy. My approach is simple: I focus on shaping the tree from the start.
Think of it like this: you want to encourage a single, strong central leader, which is basically the main trunk that grows straight up. If you see two branches competing to be that leader, I usually pick the stronger one and remove the other. It’s not about cutting off a lot of branches, just the ones that might cause problems later on.
I also keep an eye out for any branches that are growing downwards or crossing over other branches. These can rub against each other and cause damage, or just make the tree look a bit messy. Snipping those off early is a good idea. It helps with air circulation, too, which is always a plus for preventing diseases.
The goal with pruning young seedlings isn’t to make them look perfect right away. It’s more about guiding their growth so they develop a solid structure that will support them as they get bigger and heavier with fruit or just more branches.
Here’s a quick rundown of what I look for
- Remove dead or damaged branches: If a branch looks sickly or broken, it’s best to cut it off. This stops any potential issues from spreading.
- Address crossing branches: Branches that rub against each other need to be dealt with. I usually remove the weaker or poorly positioned one.
- Manage competing leaders: If two main branches are growing upwards, choose the strongest and remove the other.
- Encourage good spacing: Make sure branches aren’t too crowded. This helps sunlight reach all parts of the tree and improves airflow.
I try not to do too much at once. For young trees, a light touch is usually best. It’s better to prune a little bit each year than to try and fix everything in one go. This way, the tree doesn’t get too stressed, and it can keep putting its energy into growing.
Protecting Seedlings

Protecting your young black cherry seedlings is a key step to ensuring they grow into healthy trees. I’ve found that even with the best intentions, nature can throw some curveballs, so a little proactive care goes a long way.
One of the first things I consider is mulching. A good layer of organic mulch, like wood chips or shredded bark, around the base of the seedling is beneficial. It helps keep the soil consistently moist, which is especially important when they’re just getting established. Plus, it suppresses weeds that would otherwise compete for water and nutrients. Just be sure to keep the mulch a few inches away from the trunk itself to prevent rot and discourage pests.
Wildlife can also be a concern. Deer and rabbits, in particular, seem to have a fondness for tender young trees, especially during the winter months when other food sources are scarce. I’ve learned that a simple tree guard or a wire mesh cage can make a world of difference. These barriers protect the bark from being gnawed and the young branches from being browsed. For smaller seedlings, I sometimes use a wider plastic tree guard that extends up the trunk. It’s better to put these protective measures in place early, rather than waiting until damage has already occurred. I found this out the hard way with a batch of oak saplings a few years back; I ended up planting fewer trees that season because of the damage.
When it comes to winter care, the focus shifts slightly. While black cherries are generally hardy, protecting the roots from extreme temperature fluctuations is still a good idea. The mulch layer I mentioned earlier helps with this insulation. I also make sure not to fertilize late in the season, as this can encourage new, tender growth that might not survive a hard frost. If you’re in a region with very harsh winters, you might consider wrapping the trunks of very young seedlings with burlap for an extra layer of protection.
Here’s a quick rundown of what I typically do
- Apply a 2-3 inch layer of organic mulch around the base, keeping it away from the trunk.
- Install tree guards or wire cages around the trunk to deter rabbits and deer.
- Avoid late-season fertilization to prevent frost-susceptible new growth.
- Ensure adequate soil moisture leading into winter, but avoid waterlogged conditions.
Taking these simple steps can significantly improve your seedling’s chances of survival and vigorous growth through its vulnerable early stages. It’s about giving them a fighting chance against the elements and hungry critters.
Pests & Diseases
As I’ve been growing my black cherry seedlings, I’ve noticed a few things that can try to take hold and cause trouble. It’s not usually a huge battle, but it’s good to know what to look out for.
One of the most common issues I’ve seen is tent caterpillars. You’ll spot these by the silky webs they spin in the branches. They can eat up the leaves if you let them get out of hand. My usual approach is to just pull off the webs and caterpillars by hand when I see them. If you have a lot, a targeted spray might be needed, but I try to avoid that if I can.
Another thing that can pop up is black knot. This is a fungal problem that shows up as dark, swollen lumps on the branches. It looks bad, and if you don’t deal with it, it can weaken the tree. The best way I’ve found to manage it is to prune off the affected branches. I make sure to cut at least six inches below the knot itself, usually when the tree is dormant. Getting rid of infected bits promptly helps stop them from spreading.
Sometimes, you might see something called powdery mildew. It looks like a white, dusty coating on the leaves, and it likes humid weather. Making sure the seedlings have enough space between them helps with air flow, which can prevent this. If I catch it early, I might use a fungicide, but often just improving air circulation is enough.
It’s important to remember that while these issues can occur, a healthy seedling is often more resistant. Proper watering, good soil, and not overcrowding your plants go a long way in keeping them strong and less appealing to pests and diseases.
I also keep an eye out for cherry bark tortrix. The larvae can burrow into the bark, which isn’t good for the tree’s structure. Checking the bark for any small holes or sticky stuff oozing out is my routine. A spray in early spring can help deter them before they become a bigger problem. Keeping the tree healthy overall is the best defense, in my opinion.
When Will My Black Cherry Seedling Bear Fruit?
So, you’ve nurtured your little black cherry seedling, and now you’re probably wondering when you’ll actually get to taste some fruit. It’s a fair question, and the answer is, well, it takes a bit of patience.
Generally speaking, you’re looking at a timeline of about 5 to 10 years from when you first planted that seed until your tree is mature enough to start producing cherries. Some sources might say sooner, some might say longer, and honestly, it can depend on a few things.
Here’s a breakdown of what influences when you’ll see those first blossoms and, eventually, fruit
- Genetics: Just like people, some trees are naturally faster growers and fruiters than others. If you started from a seed of a particularly vigorous tree, you might get lucky.
- Growing Conditions: The better you treat your tree – good soil, adequate water, plenty of sunlight, and protection from harsh weather and pests – the happier and more productive it will be. A stressed tree is less likely to put its energy into making fruit.
- Care and Maintenance: Consistent watering, appropriate fertilization, and proper pruning all play a role in encouraging a healthy, fruit-bearing tree.
It’s important to remember that the first few years are all about establishing a strong root system and a sturdy trunk. The tree needs to grow before it can bear fruit.
Don’t get discouraged if your tree doesn’t produce fruit right away. Growing a fruit tree from seed is a long-term project, and the reward is a tree that’s perfectly adapted to your specific environment. Enjoy the process of watching it grow.
Wondering when your black cherry seedling will start giving you fruit? It takes some patience! Typically, you can expect your young tree to begin producing cherries after about 3 to 5 years. Keep in mind that this can change based on how well you care for it and the specific conditions it’s growing in. Want to learn more about growing fruit trees and when to expect a harvest? Visit our website for all the details!
Frequently Asked Questions
How do I prepare black cherry seeds for planting?
To start growing a black cherry tree from seed, I first collect ripe cherries, usually in mid to late summer when they turn dark purple-black. Then, I gently squeeze the seeds out of the fruit and rinse them. For the best chance of them sprouting, I place the cleaned seeds in a damp paper towel inside a plastic bag and keep them in the refrigerator for about 90 days. This cold period helps trick the seeds into thinking winter has passed, which they need to begin growing.
What is the best way to plant black cherry seeds?
I find that planting the seeds about 1 to 2 inches deep in a potting mix that drains well works best. It’s important to be patient because it can take several weeks for the seeds to sprout. I make sure the soil stays slightly moist but not soaking wet.
What are the ideal growing conditions for black cherry seedlings?
My young black cherry seedlings need at least six hours of sunlight each day to grow strong. I also make sure to water them regularly, especially when they are just starting. Keeping the soil moist but not waterlogged is key to their early development.
What common problems should I watch out for with my black cherry seedlings?
I keep an eye out for common garden pests like aphids or caterpillars. If I spot them, I usually treat them with a mild insecticidal soap. It’s also important to check for any signs of disease and trim off any branches that look unhealthy to keep the whole tree strong.
Can you explain the winter sowing method for black cherry seeds?
I prefer to use the winter sowing method because it feels simpler and less prone to mold issues. I fill a container with moist potting soil, plant the seeds about 1/4 to 3/8 inches deep, and keep the container in a cold place, like an unheated garage, but I must ensure the seeds don’t freeze solid. I also add a little water each week to keep the soil from drying out.
When is the best time to transplant black cherry seedlings?
I usually transplant my seedlings in mid-spring. However, if the weather gets warm, around 70-80°F, I wait until late summer or early fall. This cooler period reduces stress on the young trees. I’ve even planted trees as late as December, as long as the ground isn’t frozen.
How should I protect my young black cherry trees?
To help my young trees grow well, I protect them from hungry deer and rabbits, especially during winter. I often use tree shelters or cages for the first few years. These also help the tree grow faster by creating a mini greenhouse effect.
When and how should I fertilize my black cherry seedling?
I typically apply a balanced, slow-release fertilizer in early spring before the growing season starts to give the young tree the nutrients it needs. As the tree gets older, it needs fertilizer less often, but a yearly dose in the spring can help keep it healthy and growing strong.
Request a Quote
Our Services